This feature compares the computer's outgoing and incoming audio in real time, assuming that they are the pre- and post-tape audio streams, and the deviations between them indicate the tape recording quality. This function works only with a 3-head tape recorder with off-tape monitoring feature.
Oftentimes, when recording over a used tape, additional concern raises due to the unknown tape condition. Even a tape that appears fine may contain hidden flaws, causing random dropouts. Recording over it requires constant attention. This function continuously "listens" to the on going tape recording on behalf of the operator, plots deviation curves on the timeline which provide a quick visual review of the recording quality and potential issues.
However, implementing such a function is far more complex than it may seem. The two audio streams are out of sync due to various delays in the entire audio path, making direct comparison impossible without pre-aligning the two audio streams to a common timebase. Real-world audio, such as music, is not an ideal test signal for precise timebase alignment in real time. Currently, a special technique has been developed which can provide reasonable results but with a few limitations. As such, this function is primarily intended to detect major audio dropouts — a common issue with reused tapes — rather than issues like dullness, distortion, noise, and wow/flutter which are typically related to device maintenance.
Before using this function, a few setup steps will be required, as detailed below.
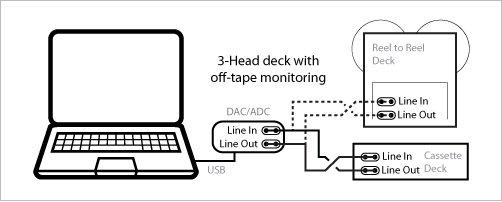
Please connect the computer's line-out port to the 3-head tape recorder's line-in port (maybe via a USB DAC); and connect the 3-head tape recorder's line-out port to the computer's line-in port (maybe via a USB ADC):
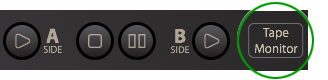
(1) By clicking on the "Tape Monitor" button on the main UI, it will automatically check if the audio input is enabled. If not, a prompt will popup with a button to enable it.
(2) From the main menu, open the item "MixtapeNerd" > "Allow Audio Input" and toggle the checkbox provided.
Either way, please save your current project before proceeding, as the app will quit and restart in order to apply the new change. The change will be remembered across launch sessions. When this function is no longer needed, please disable the audio input as it will keep the app a little bit busier.
(1) Connect the 3-head tape recorder to the computer (as aforementioned).
(2) Load a blank tape in the tape recorder.
(3) Begin recording on the tape and set the tape/source switch to "Tape".
(4) Enable the "Test Tone" checkbox in the lower-middle position of this dialog
(5) Adjust the computer's audio output volume and/or the tape recorder's recording level knob, so that the tape recorder's level meter reaches the 0 mark.
(6) Adjust the computer's audio input volume and/or the tape recorder's output volume knob (if available), until the meter bar (see below) reaches 0 (±1) dB and a green check mark (✓) shows up.

(8) Click the "OK" button when done, or click the "Cancel" button to abort.
(1) This calibration should be the last one after all other calibrations has been done. Changing of other calibrations may require repeating this calibration again. Once this calibration is done, please keep the computer's audio input/output volumes and the tape recorder's audio input/output volumes unchanged throughout the entire monitoring session.
(2) The result deviation curves include all impacts to the original audio along the audio path. To minimize the non-tape related factors, please use high quality soundcard, and keep the system's audio path as clean as possible by disabling all unnecessary processors (such as: auto gain, hearing enhancement, spacial effects, ambient noise canceller ... etc).
(3) While using this featre, please keep bare minimum number of other applications active on the same computer. If any of other applications, including the operating system itself, makes a sound, it may add an false spike on the result curves.
(4) While using this feature, please do not minimize the app's main window since audio input may be automatically stopped by some Operating Systems for security reasons.
(5) While using this feature, please do not toggle the tape deck's tape/source switch as this will break the timebase alignment which will take long time to restore.
Once the calibration is done, the monitor display will show up at the bottom of the playlist. If this display masks the playlist too much, please drag the bottom of the window to make more space.

Once the monitor is active, there is a small dot shown up next to the "Tape Monitor" button label. To hide the monitor, click on the "Tape Monitor" button again, or click on the "Hide" button at the bottom. The monitor will continue work in the background with the small dot keeps on. To bring the monitor back, just click on the "Tape Monitor" button again, no data will be lost. To quit the monitor, click on the "Quit" button, the monitor will stop and close, and the small dot will be off. To re-start the monitor, click on the "Tape Monitor" button, it will re-start from the calibration stage.
When the app start playing audio tracks, a spinning icon labeled "Synchronizing" will show up, indicating that the minitor is trying to align the incoming and outgoing audio streams to a common timebase. The length of "synchronizing" period may vary depending on the actual audio content. Upon success, the spinning icon will disappear, and the app will start drawing deviation curves for L and R channels respectively on the timeline as the tape recording progresses.
When done, you can optionally keep the result curves to an image file by clicking on the "Save..." button. This button is disabled when the tape recording is on going.


