Output the Result
⬤ Output as playlist
In this simplistic scenario, each side of the compiled virtual album can be exported as a standard .m3u8 file — a plain playlist file with the links to the source audio files. To do so, please use the menu item:
"File" > "Export Side A Playlist" or
"File" > "Export Side B Playlist".
The resulting file is in "m3u8" format which is supported by most media player apps out there, which allows for taping the album by using any media player app of user's choice. Please note that with such a basic playlist file format, all the app's proprietary settings will not be included as they are not part of the M3U standard. In other words, all the app-specific optimizations (length fitting options and audio processors) are not applicable.
Since the .m3u8 file only contains links to the associated audio files, it is recommended to save the .m3u8 file to the same folder where the associated audio files are stored.
⬤ Output as master audio file
If
the app-specific optimizations (length fitting options and audio processors) are preferred, playlist is no longer a viable option. Instead, export each entire side to a single master audio file for future taping. To do so, please use the menu item:
"File" > "Export Side A To Audio File" or
"File" > "Export Side B To Audio File".
Each side of the compiled virtual album will be exported as a single audio file, with all the audio tracks on the selected side spliced together in the order, and with all the length fitting options and audio processors applied. The supported output audio formats are: WAV, FLAC, MP3, AAC and M4A. The resulting master audio file is independent of this app and can be played by using any media player app of user's choice, or can be burnt on a CD, for final taping.
Note: If this "master" audio file is produced with any of the Audio Processors engaged, it requires the future taping system being pre-calibrated at the same reference level, or otherwise level mismatch may occur. To facilitate the calibration of the future playback environment, a separate audio file containing test signal (reference tone) will be needed. For more details, please see below.
⬤ Output reference tone
If the aforementioned "master" audio file is produced with any of the Audio Processors engaged, by the time it is to be used for recording an analog tape, the taping system has to be calibrated at the same reference level in order to avoid level mismatch errors. The reference level can be saved to a separate auxiliary audio file, which will be used for calibrating the future taping system. To create such a auxiliary audio file, please use the menu item "File" > "Save Reference Tone To File", a dialog will pop up:
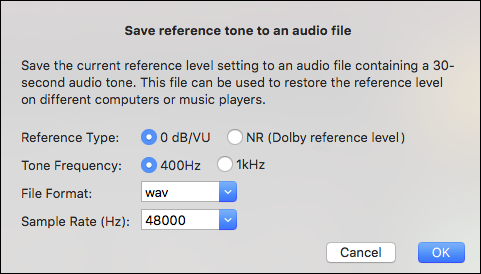
it is important to understand the options for "Reference Type". The first option means to save an auxiliary audio file with a reference tone at 0 dB or VU. The second option means to save an auxiliary audio file with a reference tone at Dolby reference level.
The first option is only good if the tape recorder used for calibrating this app will also be used for recording the tape in the future. This is because 0 DB does not have a consistent meaning across different tape recorders by brand and model, which is a less interchangeable reference.
On the other hand, if a different tape recorder will be used in future for taping, and the "Type-B/C" calibration has been done, the second option would be a safer choice. Of course, both current and future recorders should have Dolby mark on their meter, or the Dolby reference level given in their manual.
The generated auxiliary audio file contains 30 seconds of reference tone signal. To use it, play it with the chosen media player app, test recording on the tape and adjust the computer's audio output volume and/or the tape recorder's recording level knob. If the auxiliary audio file contains a 0 DB or VU reference tone, move the tape recorder's meter to the 0 DB or VU mark. But if the auxiliary audio file contains a Dolby reference tone, move tape recorder's meter to the Dolby mark. Now, the taping system is ready to record the master audio file on the tape.
For the users who don't have any allegiance to certain media player app, this app itself can be used for final taping directly. Despite being so called preview mode, there is no compromise in audio quality implied behind it. The primary consideration lies in computing speed. As the app undertakes intensive audio processing while playing audio in realtime, it is recommended to do it on a relatively powerful computer, and with minimum concurrent active tasks to avoid potential audio dropouts. In addition, the user can let the app try to request exclusive access to the sound card for virtually untouched sound quality. Please be aware that the success of obtaining exclusive access may vary across different systems and configurations, and thus may not be guaranteed for all cases.